It almost worked!
"Nothing beats a failure like another
try." Anon
C-Lab Home
Many things work the first time for us, because for nearly everything,
it's not truly the first time. Experience does that for (or to) you. However, it
sometimes happens that what seems like a good idea at the time,
isn't. This page is dedicated to those kinds of things. Why
admit we make mistakes? Why not! Doesn't everyone?
Mistakes are the great teachers in life if you take the time to figure
them out. To avoid cluttering the project pages with all the
things we tried before coming up with the best and final, we decided to
put that sort of thing here. This way, if you look at one of our
projects, and decide to duplicate it "except for this detail" you might
be spared the time it takes you to try something we've already tried
that didn't work. Enjoy!
Coffee-Can Reflow Oven
Boy...I should have paid more attention in my thermals classes (30+
years ago). Since I had had pretty good luck using aluminum body
Dale-type resistors (from WWII suplus) as heaters, we tried that first
with some newly purchased ones. A heat spreader is used to conduct
the heat where we want it. We assumed we would need one without
any testing. At the very least we needed a flat surface to mount
the flat bottomed resistors and later a heating element. Here is
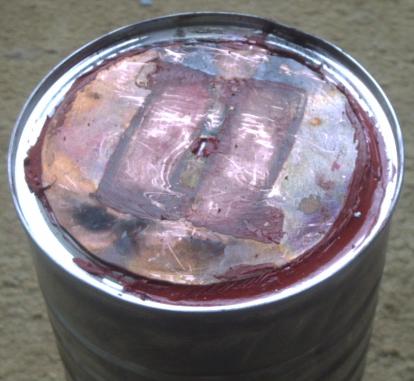
the result:
 To make the heat spreader: Obtain a
2" disk of .093" aluminum to glue into the little depression in the
bottom of the can to make the outside bottom nice and flat. We cut this
from some standard chassis material with a jigsaw, and stripped the
paint as above. Use the good red high temperature silastic (type 650,
auto parts store) in a thin layer to glue this to the bottom of the can,
and wait for it to cure. We've not found a better high temperature
adhesive than this silastic; in another application, a woodstove repair,
it has been heated to incandescence, which didn't help it much (it got
crunchy), but it survived. Cut a 3.25" disc from some copper flashing.
Drill a 1/4" hole in the center, and clean it and make it flat. We used
nitric acid to clean, about 6 normal (eg 20 or 30%, diluted from the 70%
commercial grade, exact strength not critical), then rinse, other things
would probably work as well, but this is very fast and easy, and time is
money. Make it flat by tapping with a hammer while it's on a steel
plate. Don't overdo this step, as you can find yourself inadvertantly
coppersmithing and making nice compound curves.
You can see what the resistors' footprint looked like before they
exploded with considerable force. Sorry, I didn't save them for
pictures. A call to a helpful Dale/Vishay engineer explained
all. In the old days, they used a ceramic type adhesive inside the
aluminum body. Some time ago, they went away from this, as the
different thermal expansion coefficients caused cracking of the
adhesive, and poor thermal coupling. The new stuff won't take high
temperatures, and boils. As the unit is sealed, if pushed, they
explode with some violence (as in, dent in the wall, lot of ceramic bits
flying at high velocities). Glad no one was hurt! The above
can has a 2 part heat spreader. First there is a 2"x.090" aluminum
disc glued into the dimple in the can center -- this is where we want
the heat to go. Then copper flashing at nearly the full can
diameter is glued to this. The hole in the center is to let this
glue (Silastic 650) cure in a reasonable time. The copper is not
glued everywhere, just at the aluminum center and a thin ring around the
outside. Otherwise, a cure might take years. This is
important as the silastic won't withstand heat until it is fully
cured. Heat it too soon and it decomposes. After that it
will never cure.
 Ok, so
we needed another approach, and at this point even Doug's Scottishness
will allow us to proceed with a "real" heater, bought
commercially. The McMaster-Carr
part number for the unit pictured below is 3559K25,
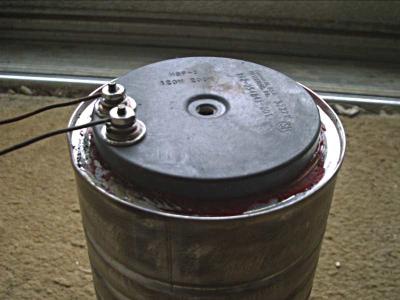
for about $42. .Here it is.
This was glued with some more red goop in a thin layer. Pretty,
huh? Well, there was just this one little problem, actually two of
them. One was too much thermal resistance between the actual
element and the can bottom, a "feature" of the thick ceramic
insulator. The other was too much thermal mass, which was
excacerbated by the first.
In the first test, we just poured the coals to this heater, full
power. At some point the Fluoroinert began to boil. We shut
the power off at that instant. Due to the thermal resistance, by
the time the can bottom reached 215°c, the internal heater was more
or less red hot. Heat therefore continued to flow and it boiled
about $25 worth of Fluoroinert right out of the can before it could be
stopped. Post mortem showed the fiberglass insulation touching the
bottom was burnt. This is a
good little heater, just not for this! Now it should be easy to
understand the problem. The high thermal resistance allowed the
heater internals to reach a far higher temperature than the "output"
face. The result was very high "effective" thermal mass, since
there was so much temperature differential. We decided if we
couldn't get it right on the first try manually, it was going to be a
little too interesting trying to get a computer to control it well, so
we moved on and tried something that did work, a halogen bulb.
Next thing we will try after that is the bulb with no heat spreader, as
it shouldn't be needed. But bulb + the spreader work fine, and the
thermal mass issues are nearly gone.
 Anything that needs plumbing is a pain, less
here than most places, since we have a chemistry bench setup, but it's
still a pain. So, after the first working rev of the reflow oven,
we decided to see if we couldn't passively cool the top of the
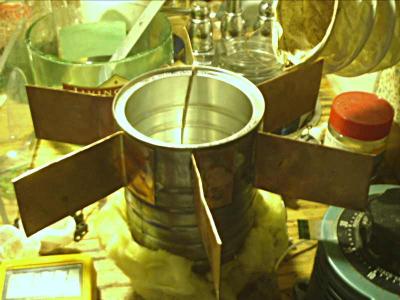
can. We tried sweating on some 2" by 4" copper flashing fins.
Here's what that looks like:
Another no-go. Well, it works "at all" but we're talking about
some expensive chemicals here, and letting any of it get away is not
good. For these fins to do any good, they must get to an
above-ambient temperature. Although the Fluoroinert that touches
the can sides condenses just fine with these, the convection rotor we
need to get the stuff in the middle isn't strong enough, so it just
wafts out of the top -- at $50 per 4 ounces. The drier hose coming
in at the right is exausting air at about 300 cfm, and this turns out to
be exactly the wrong thing to do. We tried adding some more fins,
and it looks pretty cool, but we want this thing to work. There's another slight
problem here. The preheat oven sits on top of this can, and
produces most of its heat at its base. Any that conducts down to
the lower can heats the fins and is lost, which in this case meant we
couldn't quite reach the preheat temperature goal. With water
cooling, the water can always be turned off...So that's what Model 3
will have. Again.
C-Lab Home
 To make the heat spreader: Obtain a
2" disk of .093" aluminum to glue into the little depression in the
bottom of the can to make the outside bottom nice and flat. We cut this
from some standard chassis material with a jigsaw, and stripped the
paint as above. Use the good red high temperature silastic (type 650,
auto parts store) in a thin layer to glue this to the bottom of the can,
and wait for it to cure. We've not found a better high temperature
adhesive than this silastic; in another application, a woodstove repair,
it has been heated to incandescence, which didn't help it much (it got
crunchy), but it survived. Cut a 3.25" disc from some copper flashing.
Drill a 1/4" hole in the center, and clean it and make it flat. We used
nitric acid to clean, about 6 normal (eg 20 or 30%, diluted from the 70%
commercial grade, exact strength not critical), then rinse, other things
would probably work as well, but this is very fast and easy, and time is
money. Make it flat by tapping with a hammer while it's on a steel
plate. Don't overdo this step, as you can find yourself inadvertantly
coppersmithing and making nice compound curves.
 Ok, so
we needed another approach, and at this point even Doug's Scottishness
will allow us to proceed with a "real" heater, bought
commercially. The McMaster-Carr
part number for the unit pictured below is 3559K25,
for about $42. .Here it is.
 Anything that needs plumbing is a pain, less
here than most places, since we have a chemistry bench setup, but it's
still a pain. So, after the first working rev of the reflow oven,
we decided to see if we couldn't passively cool the top of the
can. We tried sweating on some 2" by 4" copper flashing fins.
Here's what that looks like: