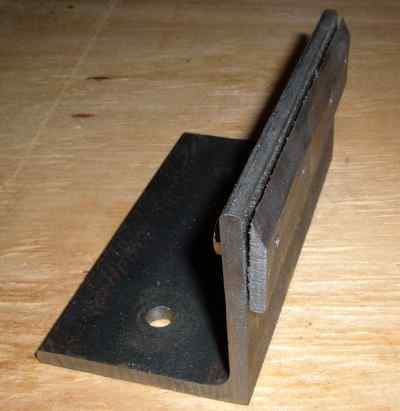
 The jig is two parts. One is
a normal grinding wheel supported on a shaft between center
and the chuck, the other is just a piece of angle iron with
an added flat piece with tapped holes in it, used to clamp
the blade to the angle piece. This whole thing mounts on the
lathe instead of the tool post. Once it is set up, it makes
very nice straight edges. Setup is time–consuming, however,
so there is some room for improvement here. For one thing, each
blade has to be set at the same height at both ends, or the
grind won't be the same all over. The jig itself of course needs
to be perfectly parallel to the ways. For the former, I think
I will add some setscrews rather than use the tap with hammer
measure, and repeat method any more. The lathe is set to fairly
low rpm for this, and the traverse is set very slow, so it doesn't
matter that the grinding wheel is actually coarse. Only that one
highest grit does any work, and the traverse per turn is less than
the width of that grit, so the result is shiny. We don't have to
worry about drawing the temper at this stage, as we are going to
heat treat anyway, but it just does a better job on cool metal that
is stiff.
The jig is two parts. One is
a normal grinding wheel supported on a shaft between center
and the chuck, the other is just a piece of angle iron with
an added flat piece with tapped holes in it, used to clamp
the blade to the angle piece. This whole thing mounts on the
lathe instead of the tool post. Once it is set up, it makes
very nice straight edges. Setup is time–consuming, however,
so there is some room for improvement here. For one thing, each
blade has to be set at the same height at both ends, or the
grind won't be the same all over. The jig itself of course needs
to be perfectly parallel to the ways. For the former, I think
I will add some setscrews rather than use the tap with hammer
measure, and repeat method any more. The lathe is set to fairly
low rpm for this, and the traverse is set very slow, so it doesn't
matter that the grinding wheel is actually coarse. Only that one
highest grit does any work, and the traverse per turn is less than
the width of that grit, so the result is shiny. We don't have to
worry about drawing the temper at this stage, as we are going to
heat treat anyway, but it just does a better job on cool metal that
is stiff.
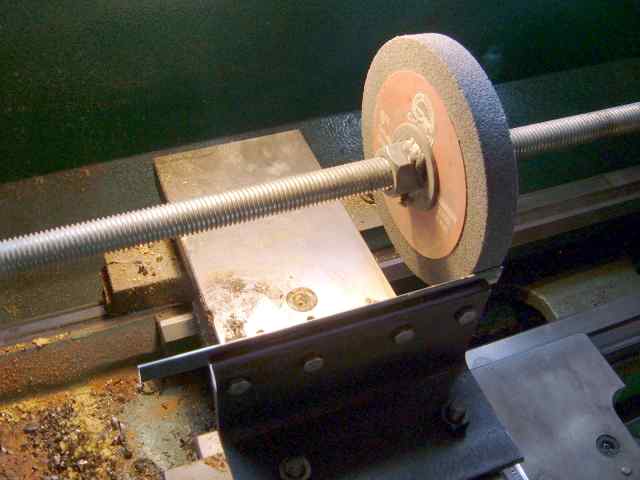 Here it is mounted and ready to rock. Not shown for this picture
are the rags that normally cover the lathe ways when doing this.
Grit and lathe ways should never mix. Once setting the jig straight,
the main work is getting the blade in there perfectly level and at
the correct height to get the edge angle desired. This jig does
not make that easy yet. If it is assumed that only 1/6" by
1/2" stock will be used, one could mill out a slot in one
of the jig faces to help set this. For more versitility I'll probably
just add a way of supporting the blade with some adjustable
set–screws at the ends.
Here it is mounted and ready to rock. Not shown for this picture
are the rags that normally cover the lathe ways when doing this.
Grit and lathe ways should never mix. Once setting the jig straight,
the main work is getting the blade in there perfectly level and at
the correct height to get the edge angle desired. This jig does
not make that easy yet. If it is assumed that only 1/6" by
1/2" stock will be used, one could mill out a slot in one
of the jig faces to help set this. For more versitility I'll probably
just add a way of supporting the blade with some adjustable
set–screws at the ends.
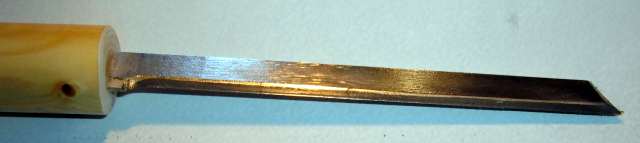 Here is a partially finished knife with a hollow ground blade
made on the lathe fixture. It was then nickel plated up to near
the edge for corrosion resistance and slipperyness. We use a neat
trick here for mounting blades into wooden stocks. The blades are
1/2" by 1/16" stock, in general. We use a forstner bit
in a lathe to drill a half inch hole in the center of the stock. We
then pick a piece of grain–matching wood and turn a half inch
dowel out of that. We split the dowel, drill a couple of 3/16"
holes in it to match ones in the blade, and put a couple of same
sized brass pins through the holes. That assembly is then epoxied
together, put back on the lathe and turned back down to a half inch.
We then glue the assembly into the stock using regular titebond wood
glue, and it is plenty strong. It looks like the blade "just
grew there" when we finish the shaping on the end. The
advantage of this is that we don't have to split the main stock and
try to make a longitudinal glue line disappear. The scratches on
the blade shown are on the A2 stock when I get it, due to its
being "precision ground". Next run I will
try buffing them out before hardening perhaps. This knife is awaiting
a visit by the customer so I can fit the stock to his grip.
Here is a partially finished knife with a hollow ground blade
made on the lathe fixture. It was then nickel plated up to near
the edge for corrosion resistance and slipperyness. We use a neat
trick here for mounting blades into wooden stocks. The blades are
1/2" by 1/16" stock, in general. We use a forstner bit
in a lathe to drill a half inch hole in the center of the stock. We
then pick a piece of grain–matching wood and turn a half inch
dowel out of that. We split the dowel, drill a couple of 3/16"
holes in it to match ones in the blade, and put a couple of same
sized brass pins through the holes. That assembly is then epoxied
together, put back on the lathe and turned back down to a half inch.
We then glue the assembly into the stock using regular titebond wood
glue, and it is plenty strong. It looks like the blade "just
grew there" when we finish the shaping on the end. The
advantage of this is that we don't have to split the main stock and
try to make a longitudinal glue line disappear. The scratches on
the blade shown are on the A2 stock when I get it, due to its
being "precision ground". Next run I will
try buffing them out before hardening perhaps. This knife is awaiting
a visit by the customer so I can fit the stock to his grip.
 Here is what happened when I tried to use a 3/8" mill bit and
a jig to hold a piece of 1075 steel in the mill at an 8° angle.
First side cut went smootly, second side small cut the same, then
when I took a fairly meaty cut of about 30 mils, this happened. The
edge is still about 10 mils thick -- it just bent out of the way
of the mill cutter in this wavy pattern. I think I will try holding
it up to the belt sander next and see if I get sort of an odd
steak knife out of it. This was attempted because milling metal off
(cutting it) is a lot faster and more efficient than grinding
(rubbing it off) is.
Well, maybe you just have to do it the slow way to get the
result you want, or maybe use a grinder for that last pass on the
mill? This has piqued my interest, expect some new results of tests
up here pretty soon. I did try sharpening this on the belt sander
after pounding out some of the ripple, but it was still too much
and left more of a saw blade than a knife blade. Too hard to clean
even if it cuts good, as the edges grab and hold bits of whatever
is being cut.
Here is what happened when I tried to use a 3/8" mill bit and
a jig to hold a piece of 1075 steel in the mill at an 8° angle.
First side cut went smootly, second side small cut the same, then
when I took a fairly meaty cut of about 30 mils, this happened. The
edge is still about 10 mils thick -- it just bent out of the way
of the mill cutter in this wavy pattern. I think I will try holding
it up to the belt sander next and see if I get sort of an odd
steak knife out of it. This was attempted because milling metal off
(cutting it) is a lot faster and more efficient than grinding
(rubbing it off) is.
Well, maybe you just have to do it the slow way to get the
result you want, or maybe use a grinder for that last pass on the
mill? This has piqued my interest, expect some new results of tests
up here pretty soon. I did try sharpening this on the belt sander
after pounding out some of the ripple, but it was still too much
and left more of a saw blade than a knife blade. Too hard to clean
even if it cuts good, as the edges grab and hold bits of whatever
is being cut.
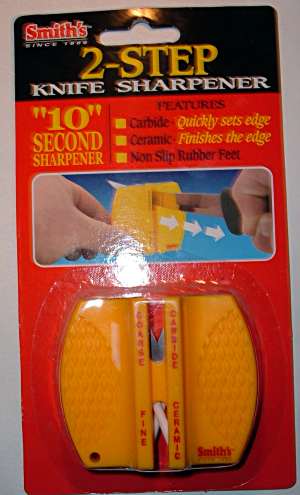 Money can't always buy you love, or something like that. After
trying most of what's on the market, this is what we found that
works the best, no kidding. We've used waterstones with angle
jigs, and all the other stuff I'll probably get email about as
well. We don't usually use metal that develops a wire edge (E.G.
crummy stainless steel), and so rarely need a buffer.
Actually, the best edge I've ever seen was put onto a
piece of aluminum by hydrochloric acid. It seems that suspending
aluminum in foaming acid (it makes its own due to the violence
of the reaction) does this just so. Of course, that edge didn't
last long.
Money can't always buy you love, or something like that. After
trying most of what's on the market, this is what we found that
works the best, no kidding. We've used waterstones with angle
jigs, and all the other stuff I'll probably get email about as
well. We don't usually use metal that develops a wire edge (E.G.
crummy stainless steel), and so rarely need a buffer.
Actually, the best edge I've ever seen was put onto a
piece of aluminum by hydrochloric acid. It seems that suspending
aluminum in foaming acid (it makes its own due to the violence
of the reaction) does this just so. Of course, that edge didn't
last long.When our blades come off the lathe jig, they are very acute at the edge. This tool puts a somewhat more obtuse angle on. The resulting profile has shoulders where the angles meet. This is where most of the wear takes place according to what the microscope shows me. The result is that for awhile, the blade actually gets sharper with use! A lot of times, especially in certain materials, once a cut is begun, it continues mostly by wedging action; there is a little crack formed in the material ahead of the actual blade edge due to this. In fact, this is how the basic carbide lathe tool removes material. Once a cut is begun, most of the wear and heat happen just behind the edge, not right at the edge. This is good for the tool, as the edge is by definition thin and not able to conduct heat away very well.
One of the things they don't tell you with this tool is a couple of neat tricks in its use. First, mount the darn thing in a bench vise. That's much safer! Now, if the knife is drawn through the coarse side with the point down (eg not horizontal) and the right force is used, the carbide cutter will "chatter", giving you kind of a micro steak knife edge. If you do this, skip the fine side.