Inexpensive inert atmosphere UV curing source
C-Lab Home
A customer's product needed to be encapsulated in a very inert
substance to be used on the human body. We selected a UV cure
encapsulant as the best solution, but then needed a way to cure the
stuff for prototypes. A little web searching showed us that the UV
cure business can be an expensive club to join, with a minimal source
costing on the order of $3,000.
This offended Doug's Scottishness, and the result was this project.
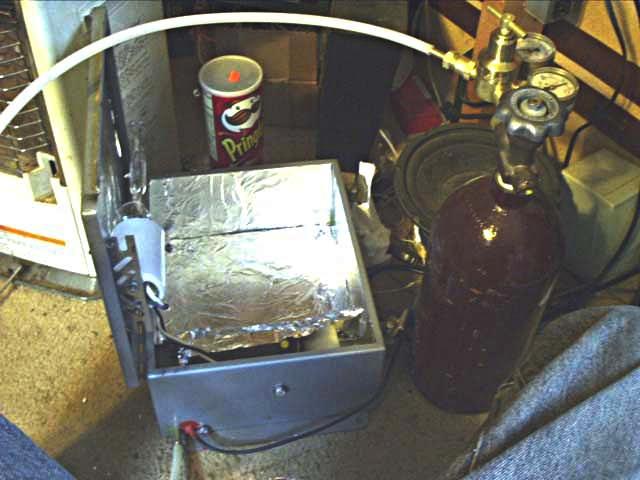
First we obtained a nearly airtight steel box with a hinged lid, of the
sort used for holding electrical breakers outdoors. At the same
place (State Electric, a fine outfit) we obtained a 250 watt mercury
vapor bulb and a ballast kit. Here are the steps to a cheap UV
source that will cure most substances on the market tack free very
quickly.
- Make the box reasonably airtight.
- Install the fitting for the argon or other inert gas near the
bottom.
- Prepare the bulb -- cut off the outer envelope.
- Install the bulb and ballast.
- Install the reflectors.
- Proceed to use the device successfully.
1. Box dimensions: 10" x 12" x 5.5" high. A somewhat larger box
is fine, but takes longer to fill with whatever inert gas you'll
use. The box we obtained was airtight already, with welded seams
and a gasketed lid. If your box is not, use silastic to make it
tight. We like to use the high temperature red stuff you can get
at the auto parts store even in relatively low temperature applications
such as this one, as it is somewhat tougher than the run of the mill
stuff you get at the hardware store for use in a caulking gun.
2. We needed something that would allow the argon into the box,
that would fit the tubing we have, not leak, and be strong enough to
last through a little rough handling. A quick look around the
place located a .223 Remington shell which looked ideal for the
job. After necking it up a little in my 6mm PPC die, we cut the
case head off. Drilling a 3/8" hole near the bottom of the box
gives a very nice, tight fit as the shell body is tapered. We
didn't have to get out a welder and mess up the paint, or even use any
sealant. All it took was a few gentle hammer taps to set the shell
into the hole permanently.
3. The streetlamp bulb we obtained has an outer glass envelope
that blocks UV and is phosphor coated to whiten the light
somewhat. This has to go, we want direct exposure to the UV from
the internal quartz capsule. One could simply crush this in a
vise, but we have a better way to handle glass here. Put a diamond
wheel in a dremel tool, with the whole thing mounted in a dremel
drillpress. Set the height appropriately so the cut will be near
the mogul bulb base. Now hold the bulb gently against the spinning
wheel while rotating it carefully. You will want to be careful not
to tilt the bulb or do anything to let the line not be straight and
joined at the end. You could simply cut all the way through, but
hey, that's work! Here, we use 20 mil nichrome wire (from Alpha Aesar) in a loop, wrapped into
the cut line. Putting a few amps through this heats it up enough
to shatter the glass in a perfectly clean cut. If you're safety
minded, safety glasses are a good idea during all of this, as is
sanding down the sharp edges while wearing work gloves -- the glass will
sometimes cut the sandpaper. You can imagine what would happen if
you weren't wearing some tough gloves at that point.
4. We made a little angle bracket to mount the mogul socket to
the lid of the box. Since the box is thick steel, we tapped 10-32
holes in it to mount the bracket, and needed no sealant on these.
We mounted the ballast to the bottom floor of the box. We could
have used silastic here, but got serious about it and tapped the ballast
holes to 1/4-20 and used real bolts through the box into the tapped
holes. To be honest, silastic would have been a better idea, as
the firm mounting provided by the bolts helps the box transmit the hum
of the ballast transformer. But we were impatient to try the
thing, and didn't want to have to wait for another cure time. No
chance of leaving this thing on by accident!
5. Aluminum foil makes a great cheap reflector for UV
light. Silastic in a thin layer holds it to the box surfaces
nicely, as would contact cement, but remember, the stuff right behind
the bulb is going to get pretty hot. We cut pieces out to match
each side of the box and glued them in. It's not necessary
to have it perfectly smooth, but don't crumple it up first either.
6. Use. If you don't fill the box with an inert gas such as argon
(nitrogen would probably work too) you will get an absolutely
eye-watering amount of ozone from the shortwave UV the bulb emits while
warming up. We are talking well past "springtime fresh"
here. The effect is more like "Run, someone just released 30 cu ft
of chlorine in the room". Also, the surface layer of your UV cure
substance won't cure tack-free, as the oxygen inhibits this. It
eventually does cure without using the inert gas, but it can take up to
24 more hours of sitting around, during which time it picks up
dust. Here, once we tried argon, borrowed from our MIG welder, we
never looked back. The little bit of extra cost is way worth it in
practice. The type of regulator you use with a welder is ideal for
this, as we know the size of the box and the regulator is calibrated in
cubic feet per hour. A little math and you know how long to wait
before starting up the lamp. We put our parts to be cured into the
box, start the argon flow, slow is better as you can use less. The
argon is heavier than air, so if you don't create a bunch of turbulence
in the box, you can use just about exactly the box volume, and not need
more. This is why the fitting is at the bottom, so the displaced
air just leaks out of the top. During the run, we leave the
gasketed top loose, and let the weight of the steel seal it "well
enough". Here we find that a 4-5 minute run, including lamp warmup
time, works great. Too much longer than this, and your part had
better be fairly heat resistant. Too much shorter and you get no
cure. The mercury in the bulb has to become vapor at medium
pressure to put out the crucial 360 nm spectral line needed by the UV
curing plastics. Once there, it only takes a few seconds to
actually do the curing. I suppose if you were doing a production
line sort of thing, this wouldn't be the most practical way. In
that case, use some of your money from selling the product and buy the
professional model.
Total costs:
Box: about $20 (actually, it was in our junk box for free)
.223 shell -- free to 30 cents, depending.
Bulb and ballast: about $100 from State Electric.
Line cord: In our junk box, call it $3 to buy an extension cord
and cut off one end.
Aluminum foil: perhaps 10 cents worth
Silastic: maybe a dollars worth of the expensive red stuff.
Time: less than one engineer-day, call it $200 worth.
Total cost: $324.40 -- less than 1/10th of what it would normally
cost to join this "club".
Here at C-Lab, that sort of fat "X" factor is what turns us on.
No wimpy 10% savings for this crowd! Even if we add the cost of
buying an argon tank and regulator at the local welding supply house, we
only add about $120 dollars to this, and still have a fat factor, and a
tool we know how to fix when it breaks.
Late breaking news:
We found that after some hours of operation, the shortwave UV from this source
is eliminated due to "solarization "of the quartz lamp. Thus the argon is
no longer needed after this period. There will be an update soon at:
Coulter's Smithing, where
we are using a newer version of this source for exposing other photosensitive things.
C-Lab Home