Photomultiplier:
Coulter's Smithing Home.
 On recently acquiring a large collection of tubes of various kinds, it
became possible to do this project, one I've wanted to do for awhile. This
photon counter (or at least I'm told it is possible to count single
photons with this tube) can be fitted to the telescope for astronomy
purposes, or used with some scintillator material as a radiation detector.
Key design issues here are that it has to be easy to mount to things in
a light-tight way, and the electrical leakages have to be kept very low.
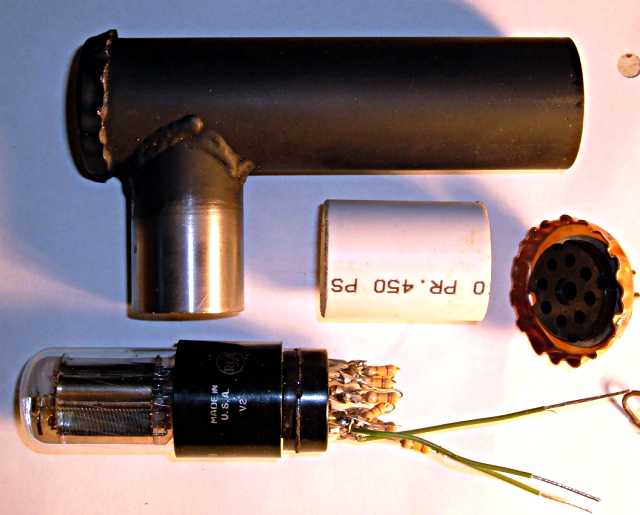
The first was satisfied by the welded metal tubing shown, which just
fits the standard 1.25" telescope accessories. The second was done
as well as I can, by getting the various insulators very clean, and using
ceramic sockets on the end. Most of the 8 pin tube plug pins will be
grounded to keep the approximately -1000 volt supply current from leaking
into the output pin. I will probably build a small transimpedance amplifier
right on the connector socket external to this, so it can drive cables
better. I used 470k ohm resistors for the divider chain, and may add
bypass capacitors to it later as I've seen done in other photon counters.
In other words, I need to make this so I can take it back apart too. I
will probably use the time honored approach of pushing on the bottom
cup and wrapping it all in black tape.
On recently acquiring a large collection of tubes of various kinds, it
became possible to do this project, one I've wanted to do for awhile. This
photon counter (or at least I'm told it is possible to count single
photons with this tube) can be fitted to the telescope for astronomy
purposes, or used with some scintillator material as a radiation detector.
Key design issues here are that it has to be easy to mount to things in
a light-tight way, and the electrical leakages have to be kept very low.
The first was satisfied by the welded metal tubing shown, which just
fits the standard 1.25" telescope accessories. The second was done
as well as I can, by getting the various insulators very clean, and using
ceramic sockets on the end. Most of the 8 pin tube plug pins will be
grounded to keep the approximately -1000 volt supply current from leaking
into the output pin. I will probably build a small transimpedance amplifier
right on the connector socket external to this, so it can drive cables
better. I used 470k ohm resistors for the divider chain, and may add
bypass capacitors to it later as I've seen done in other photon counters.
In other words, I need to make this so I can take it back apart too. I
will probably use the time honored approach of pushing on the bottom
cup and wrapping it all in black tape.
|
The tube pictured is an old RCA 931a I got "new" in the box,
manufactured in April, 1945 according to same. Well, unless air has leaked
into it, it should be fine, there's not much to go wrong with one of these.
Construction was simple, sort of. First tubing of the right sizes was
obtained from McMaster-Carr. Then the larger piece that contains the
tube was put into the mill and a slot cut in it where the light is to enter.
The other piece was then notched with a bimetal hole saw. This part was
WAY too exciting, and almost broke the drillpress. It's just not rigid
enough to keep the teeth of the hole saw pulling themselves into the
metal too fast, and won't go slow enough. So all this was moved to the
milling machine at 60 rpm, and there it went fine. The pieces were clamped
in a vise and wire welded.
Next, end caps were needed. I could have just cut some sheet metal and
welded it on there, I suppose, but I wanted something a bit more elegant,
and removable. So, a jig was made by using a 1-5/8" Forstner bit to
drill about halfway through a piece of very hard oak from some
100 year old flooring. This became the die. For the punch I just used
another piece of the 1-1/2" inch tubing with the edges rounded a bit.
Plugging in a 2" copper flashing washer and pushing in the pipe with
a press made the caps. The top cap was then soldered in place with the
normal plumbing stuff, and all tested for light tightness.
For the base, I punched a hole in one of the copper caps to hold an octal
tube base. This is held in with a snap ring, then J&B weld for light
tightness. The piece of PVC pipe in the picture is an insulating spacer
to keep the resistor chain from shorting to the pipe, and to keep the
tube more or less in place. Not shown is a piece of cardboard I intend
to add as a shim to make the tube a friction fit.
Of course, to be cool, anything telescope related must be black, so I
painted it all with flat black spray paint. Unfortunately, the 1.25"
tubing is that, exactly, and so are the eyepiece holes in the scope gear,
so that paint and some metal had to go to make things fit.