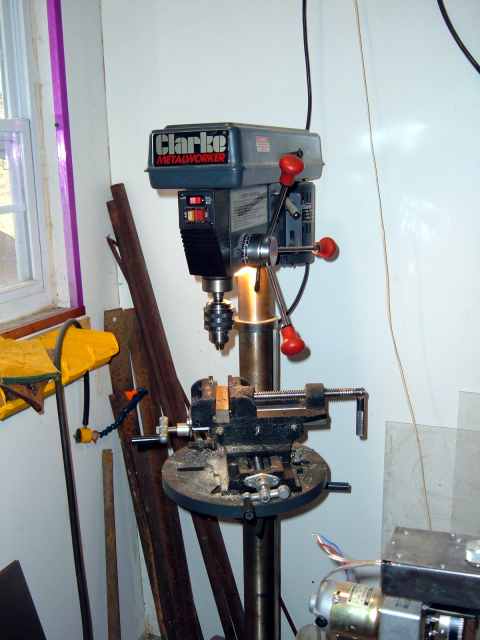
 This Clarke drill press was bought at Tractor Supply. This is
a good line of import stuff. There is zero play in the quill,
and there are plenty of speeds. The cross slide vise is from
Harbor. It wasn't all that good until we bought some wavy washers
from McMaster and took up the end slack. It still doesn't have
really straight ways, or even tension over travel, but it is
a lot better than a vise you can't move. Once aligned, it makes
it easy to drill holes in a line parallel or normal to the
jaw edges. The bins on the wall are for drill press related stuff,
like the "everyday" drill bits, a pin vise for little
drills, jigs, and holdowns. The "precision" drill bits
are kept elsewhere to keep them from being grabbed up and worn
out on "unworthy" work. Should have cleaned up before
taking the
picture, but this is a working shop, after all. When it matters
to the work, we get it sano, but otherwise let it accumulate until
it gets in the way. In the name of cheapness and fun, we did our
own anodizing and dyeing on that window trim. This way we have
samples a customer can point to for color choices and finishes.
We are unlikely to misplace the window trim, a big advantage.
This drill press was on sale for $129 when it was bought. The
fact that I could get the one I touched in the store to check
quill play was a moderately big deal.
This Clarke drill press was bought at Tractor Supply. This is
a good line of import stuff. There is zero play in the quill,
and there are plenty of speeds. The cross slide vise is from
Harbor. It wasn't all that good until we bought some wavy washers
from McMaster and took up the end slack. It still doesn't have
really straight ways, or even tension over travel, but it is
a lot better than a vise you can't move. Once aligned, it makes
it easy to drill holes in a line parallel or normal to the
jaw edges. The bins on the wall are for drill press related stuff,
like the "everyday" drill bits, a pin vise for little
drills, jigs, and holdowns. The "precision" drill bits
are kept elsewhere to keep them from being grabbed up and worn
out on "unworthy" work. Should have cleaned up before
taking the
picture, but this is a working shop, after all. When it matters
to the work, we get it sano, but otherwise let it accumulate until
it gets in the way. In the name of cheapness and fun, we did our
own anodizing and dyeing on that window trim. This way we have
samples a customer can point to for color choices and finishes.
We are unlikely to misplace the window trim, a big advantage.
This drill press was on sale for $129 when it was bought. The
fact that I could get the one I touched in the store to check
quill play was a moderately big deal.
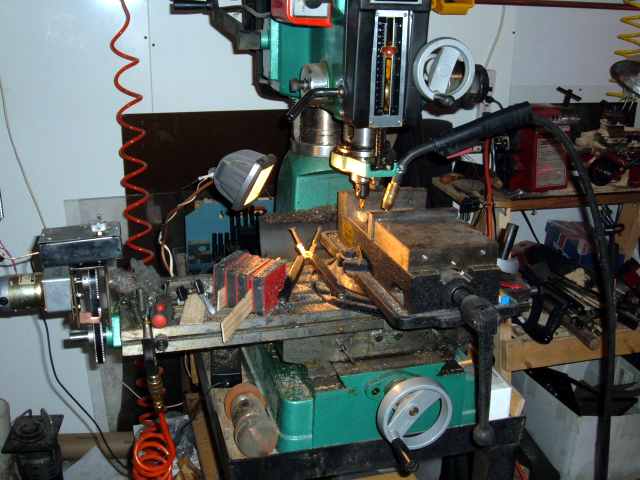 This is the milling machine we got from Harbor freight for a
little under a dollar a pound. Well worth it. With the additions
shown it has become a very useful tool. The traverse and wire
welder mount together make it possible to lay down very nice
welds quickly, and then make them flat with the mill with no
new setup required. This is nice for welding a tool steel edge
onto a plain steel knive body, for example. The vice pictured
is about the minimum you would want. The one that came with it
and all of the drill press vices we tried just didn't cut it.
You really need rigidity, and you don't want this 2 hp thing
picking up a workpiece and flinging it at you! Seems to have
plenty of power. One moan we have is that some of the R8
collets we have don't have enough thread length for the bolt
provided. We have that lathe, so just made a spacer, but gee,
that's what standards are supposed to be for. We also got
a circular indexing table from Harbor, this one made in India,
and it seems good. Used it so far to mill a circular gasket
slot into a piece of steel so we could use mason jars as vacuum
bell–jars.
This is the milling machine we got from Harbor freight for a
little under a dollar a pound. Well worth it. With the additions
shown it has become a very useful tool. The traverse and wire
welder mount together make it possible to lay down very nice
welds quickly, and then make them flat with the mill with no
new setup required. This is nice for welding a tool steel edge
onto a plain steel knive body, for example. The vice pictured
is about the minimum you would want. The one that came with it
and all of the drill press vices we tried just didn't cut it.
You really need rigidity, and you don't want this 2 hp thing
picking up a workpiece and flinging it at you! Seems to have
plenty of power. One moan we have is that some of the R8
collets we have don't have enough thread length for the bolt
provided. We have that lathe, so just made a spacer, but gee,
that's what standards are supposed to be for. We also got
a circular indexing table from Harbor, this one made in India,
and it seems good. Used it so far to mill a circular gasket
slot into a piece of steel so we could use mason jars as vacuum
bell–jars.The magnets on the bed were an attempt to do this with a magnetic chuck, more or less. Turned out to be a bad idea. While magnets are very nice around a wood shop, they are a mixed blessing in a metal shop. Had some real fun de–gaussing the table after that. We do use magnets to hold things like chuck keys on the machines. But getting your tools magnetized is not a good thing. They then hold chips which find their way into your skin, and can be pretty hard to remove. It's not like a wood splinter that will fester up and squeeze out like a pimple after a day or so, these seem to just screw themselves in farther. The stand holds bits, jigs and so forth right there at the machine. The orange air hose in the picture has regulated dry air with cutting oil in it rather than air–tool lube. It serves both the mill and the drill press. This cost about $800, and we took it home ourselves on a flatbed trailer. Thanks Paul!
 We got this partly in frustration while waiting for the larger one,
but it has been a good learning tool, and has found good uses. Once
the plastic gears broke (Doug ran the carriage into the stop) it
can't be used for threading any more, but has uses nontheless. Here
it has a piece of wood in it destined to become a knife stock. Doug
built a little motor drive for the remaining gears, so there
is a traverse. This is for something entirely different. As this
lathe can spin fast, and the traverse can be very slow, it can
make diffraction gratings on round stock. Pretty cool. I wish
every machine in the shop had this variable speed feature. One other
quality control issue with this is the switch. It eats things like
chips or sawdust, and stops working. It is a real pain to take
apart and fix. We will replace it with something better.
And oh yeah, after working on it for about a year, Harbor cannot
get replacement gears. Nor can we find them ourselves. The
clamp–on lamp on the left is a 150 watt spot, for drying
finishes quickly. This is a good place to apply them and sand them back
down. For drying, we turn the lathe slowly so the heat is even
and there is a little wind on the workpiece. We made the center
that's holding the wood on the other lathe. See that screwdriver
on the lathe pan? If you see these at the hardware store, get
them. This is an exception to the cheap Chinese handtool rule, these
are really very good, and the color coding is useful. Real chrome
vanadium steel these, and the handles are comfortable.
We got this partly in frustration while waiting for the larger one,
but it has been a good learning tool, and has found good uses. Once
the plastic gears broke (Doug ran the carriage into the stop) it
can't be used for threading any more, but has uses nontheless. Here
it has a piece of wood in it destined to become a knife stock. Doug
built a little motor drive for the remaining gears, so there
is a traverse. This is for something entirely different. As this
lathe can spin fast, and the traverse can be very slow, it can
make diffraction gratings on round stock. Pretty cool. I wish
every machine in the shop had this variable speed feature. One other
quality control issue with this is the switch. It eats things like
chips or sawdust, and stops working. It is a real pain to take
apart and fix. We will replace it with something better.
And oh yeah, after working on it for about a year, Harbor cannot
get replacement gears. Nor can we find them ourselves. The
clamp–on lamp on the left is a 150 watt spot, for drying
finishes quickly. This is a good place to apply them and sand them back
down. For drying, we turn the lathe slowly so the heat is even
and there is a little wind on the workpiece. We made the center
that's holding the wood on the other lathe. See that screwdriver
on the lathe pan? If you see these at the hardware store, get
them. This is an exception to the cheap Chinese handtool rule, these
are really very good, and the color coding is useful. Real chrome
vanadium steel these, and the handles are comfortable.
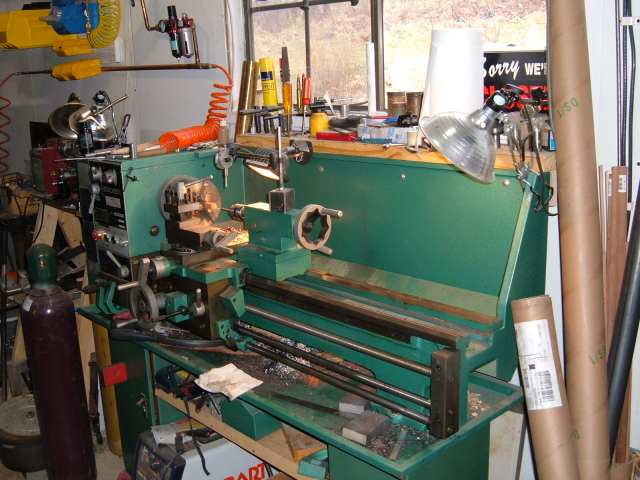
 Here's the mother of all shop tools, our big lathe.
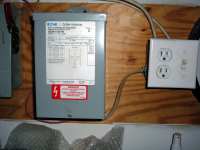
In case you were wondering how one runs a 220v tool from
a 120v solar power inverter, this transformer is the answer.
It is wired so that it can be switched off when not needed,
as it hums and draws a little current just to be connected
to the mains. The halogen lamp over the lathe bed is wired
across the second phase this transformer creates, so as to
remind us not to leave it on when it's not being used.
We also have a 4 jaw chuck and straight faceplate for this,
and some special jigs we've made for it. There is a big enough
hole through the quill to pass a rifle barrel for chambering and
threading. Since those are accuracy operations, it is nice to
be able to do them right up at the chuck, not floating out
over the bed somewhere, even if a steady rest is used. At the
moment, the lathe is set up to drill an accurately centered hole
in a turned dowel, which will become a coil form for a galvanometer
I am making for the fun of it. The lathe with appropriate jigs
is also used for grinding knife and planer blades, and puts
a very nice hollow ground edge on these. A main feature of
this thing is simply its bigness. Most things will go on there
to be machined with no sweat. the 2 hp it has seems to be enough
at least for everything we've tried, and we've tried some
pretty rapid stock removal at times. As far as bits go, we're not
as happy with the Chinese stuff, even carbide, as the American
stuff, so far. We also make our own for special purposes, but
it's kind of a trick to make your own cemented carbide...so we
are stuck with HSS for that. This is bolted to both floor and wall,
and the floor along this wall has an extra support rail and set
of pilings about 2 feet in from the edge to support this heavy stuff.
We may put the transformer and our big air compressor on another
inverter set to seach mode to automate all that. While the Trace
SW 4024 laughs at 2 hp loads, running a couple and then starting
a big compressor does blink the lights a bit. Of course, that
could be the batteries dragging down under the huge peak load
at 24v.
Here's the mother of all shop tools, our big lathe.
In case you were wondering how one runs a 220v tool from
a 120v solar power inverter, this transformer is the answer.
It is wired so that it can be switched off when not needed,
as it hums and draws a little current just to be connected
to the mains. The halogen lamp over the lathe bed is wired
across the second phase this transformer creates, so as to
remind us not to leave it on when it's not being used.
We also have a 4 jaw chuck and straight faceplate for this,
and some special jigs we've made for it. There is a big enough
hole through the quill to pass a rifle barrel for chambering and
threading. Since those are accuracy operations, it is nice to
be able to do them right up at the chuck, not floating out
over the bed somewhere, even if a steady rest is used. At the
moment, the lathe is set up to drill an accurately centered hole
in a turned dowel, which will become a coil form for a galvanometer
I am making for the fun of it. The lathe with appropriate jigs
is also used for grinding knife and planer blades, and puts
a very nice hollow ground edge on these. A main feature of
this thing is simply its bigness. Most things will go on there
to be machined with no sweat. the 2 hp it has seems to be enough
at least for everything we've tried, and we've tried some
pretty rapid stock removal at times. As far as bits go, we're not
as happy with the Chinese stuff, even carbide, as the American
stuff, so far. We also make our own for special purposes, but
it's kind of a trick to make your own cemented carbide...so we
are stuck with HSS for that. This is bolted to both floor and wall,
and the floor along this wall has an extra support rail and set
of pilings about 2 feet in from the edge to support this heavy stuff.
We may put the transformer and our big air compressor on another
inverter set to seach mode to automate all that. While the Trace
SW 4024 laughs at 2 hp loads, running a couple and then starting
a big compressor does blink the lights a bit. Of course, that
could be the batteries dragging down under the huge peak load
at 24v.
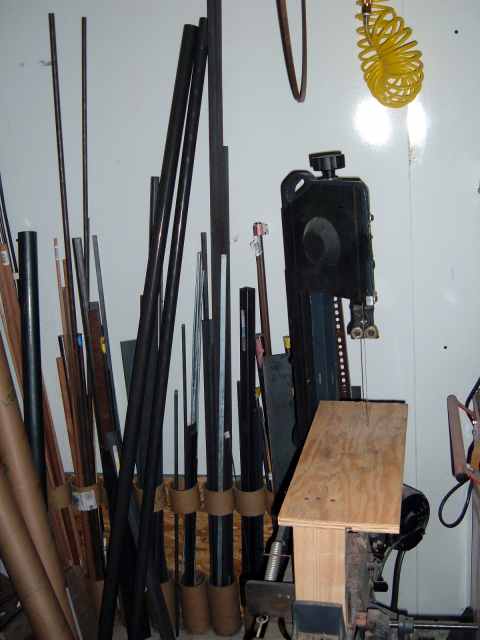 This is your basic metal cutting bandsaw. This one is a Clarke,
also from Tractor Supply. I forget how much it cost exactly, but
it didn't disturb the lunch budget – something under $200.
The clamp–in table is a nice
addition, as is the drywall mud pan to catch most of the filings.
Doug also built a jig for this that lets us slit things like
knife stocks long–ways, wood or metal. Does such a nice
job of that you need a magnifier to see the line once the pieces
are back together. In the background is the steel rack, made from
pieces of mailing tube that McMaster packs long things in. There's
quite a few bucks in that rack, as a lot of it is not just plain
steel. For awhile there, Home Depot was selling these incredibly
hard, insanely fine grained wood dowels for really cheap. So we
picked up a few of those too. The galvanized stock is
"interesting". That was bought at Home Depot as "fence
tensioning rod" for about 1/5th the price of the same steel
ungalvanized elsewhere in the store, sold as "steel".
It pays to pay attention. I think we paid about $1.59 for 6 foot
pieces of this stuff, 1/8" by 1/2". The alloy seems to
be about 1040, so it is useful for a lot of things. OK, one has to
strip off the zinc before welding, but that's no big deal. One thing
we tried with this stuff that was at least a partial success, was
plating chromium on it and case hardening it for knife blades. Worked
better than expected, but the jury is still out. We have a couple
in people's hands for long term testing. We get a very hard outer
with a tough inner core this way. The chrome seems to melt into the
steel during heat treatment. Anyway, a good tip is to buy your
steel as something else, not as "steel". Almost always
it will be cheaper. Conduit and some other things come to mind
on this one too. We used conduit with some internal bracing to
make our lightning rods here. We made the bracing out of ground
rods, which also were cheaper bought as such than the equivalent
steel would have been.
This is your basic metal cutting bandsaw. This one is a Clarke,
also from Tractor Supply. I forget how much it cost exactly, but
it didn't disturb the lunch budget – something under $200.
The clamp–in table is a nice
addition, as is the drywall mud pan to catch most of the filings.
Doug also built a jig for this that lets us slit things like
knife stocks long–ways, wood or metal. Does such a nice
job of that you need a magnifier to see the line once the pieces
are back together. In the background is the steel rack, made from
pieces of mailing tube that McMaster packs long things in. There's
quite a few bucks in that rack, as a lot of it is not just plain
steel. For awhile there, Home Depot was selling these incredibly
hard, insanely fine grained wood dowels for really cheap. So we
picked up a few of those too. The galvanized stock is
"interesting". That was bought at Home Depot as "fence
tensioning rod" for about 1/5th the price of the same steel
ungalvanized elsewhere in the store, sold as "steel".
It pays to pay attention. I think we paid about $1.59 for 6 foot
pieces of this stuff, 1/8" by 1/2". The alloy seems to
be about 1040, so it is useful for a lot of things. OK, one has to
strip off the zinc before welding, but that's no big deal. One thing
we tried with this stuff that was at least a partial success, was
plating chromium on it and case hardening it for knife blades. Worked
better than expected, but the jury is still out. We have a couple
in people's hands for long term testing. We get a very hard outer
with a tough inner core this way. The chrome seems to melt into the
steel during heat treatment. Anyway, a good tip is to buy your
steel as something else, not as "steel". Almost always
it will be cheaper. Conduit and some other things come to mind
on this one too. We used conduit with some internal bracing to
make our lightning rods here. We made the bracing out of ground
rods, which also were cheaper bought as such than the equivalent
steel would have been.Although this bandsaw met all expectations, it is so doggone useful around here that it is one of the things we kind of wish we'd spent more money on, you know, to get a fancier and larger one. It's just great to put something in there, start it and walk away while it does all the work. I grew up in a household where this would be hacksaw territory, which is something like purgatory once you've used one of these. The yellow air hose in the background is dry air for blowing off chips. We have a color code for things like this.
 Seeing double? We happened to scrounge a couple of these
cheap Delta bench drill presses. They are no better than
you'd expect, but are handy. We mostly use them to either
chuck a tiny drill the other one won't eat, or for wire wheel
and other wheel sorts of prep and finishing. The Clarke tool
chest they are sitting on is full of drills, holesaws, taps,
dies, clamps, and other things used at this end of the shop.
We are getting towards the "messy" end of the shop here.
The layout segregates the things that throw lots of chips, sawdust,
abrasive, and so on from those things that are allergic to same.
Seeing double? We happened to scrounge a couple of these
cheap Delta bench drill presses. They are no better than
you'd expect, but are handy. We mostly use them to either
chuck a tiny drill the other one won't eat, or for wire wheel
and other wheel sorts of prep and finishing. The Clarke tool
chest they are sitting on is full of drills, holesaws, taps,
dies, clamps, and other things used at this end of the shop.
We are getting towards the "messy" end of the shop here.
The layout segregates the things that throw lots of chips, sawdust,
abrasive, and so on from those things that are allergic to same.
Note: The "scotchbrite" wheel on the drill press on the right is just the thing for putting on a fine satin–brushed looking finish, fast. It was gotten at Caswell Plating. McMaster has a line that looks similar, but we've not tried them yet. We made a mandrel for it on the big lathe, using a big bolt, turning it down to where it would fit in the chuck of the little Delta.
The stock rack in the back is where we keep the "not plain steel" stuff. Aluminum, brass, tool steel, diamond covered steel flats, things like that.
The multi–colored drill bits between the presses are our precision set of cobalt bits. These are very nice, and we keep the set complete with replacements from McMaster. Got them originally on sale at Northern Hydraulics. The cobalt ones, besides being pretty, are really better, make cleaner holes closer to the correct size, and so forth. The TiAlN ones we get from McMaster to replace these are even better, though.
 These are some buffing machines, probably the most dangerous
tools in the shop if one doesn't pay attention. The green
machine is from Caswell, and it really rocks. We use two
sisal wheels on the left with a softer wheel between, and the
grey compound for rough finishing. Things happen fast on this
wheel, both in the finishing sense, and related to the dents
in the floor and wall near it. In the foreground is a machine
I made with a 1/2 hp motor, for knife work. It doesn't need
that much power. The interesting innovation there is the cowhide
glued to the outsides of the wheel. This is good for putting
on that final shine and edge. We had needed cowhide for a
color case hardening recipe, and the only available source
at the time was an entire hide at the fabric store. You
should have seen the looks on their faces when I told them
most of it would be burned. It finds a lot of other uses around
here, once you've paid $100 for an entire cowhide, the only size
they sold. It makes a dandy slip in for a bench vise to avoid
scratching things, for example. Used another piece as a sort
of spring to make the tracking adjustment on the mill traverse.
These are some buffing machines, probably the most dangerous
tools in the shop if one doesn't pay attention. The green
machine is from Caswell, and it really rocks. We use two
sisal wheels on the left with a softer wheel between, and the
grey compound for rough finishing. Things happen fast on this
wheel, both in the finishing sense, and related to the dents
in the floor and wall near it. In the foreground is a machine
I made with a 1/2 hp motor, for knife work. It doesn't need
that much power. The interesting innovation there is the cowhide
glued to the outsides of the wheel. This is good for putting
on that final shine and edge. We had needed cowhide for a
color case hardening recipe, and the only available source
at the time was an entire hide at the fabric store. You
should have seen the looks on their faces when I told them
most of it would be burned. It finds a lot of other uses around
here, once you've paid $100 for an entire cowhide, the only size
they sold. It makes a dandy slip in for a bench vise to avoid
scratching things, for example. Used another piece as a sort
of spring to make the tracking adjustment on the mill traverse.Both buffers are on the "cheaper" stand from Harbor, at about $20. It's a better stand than the more expensive one they sell. Go figure. The Caswell buffer is also screwed to the floor, and needs to be. One might find oneself really leaning on this tool to get a result quickly.
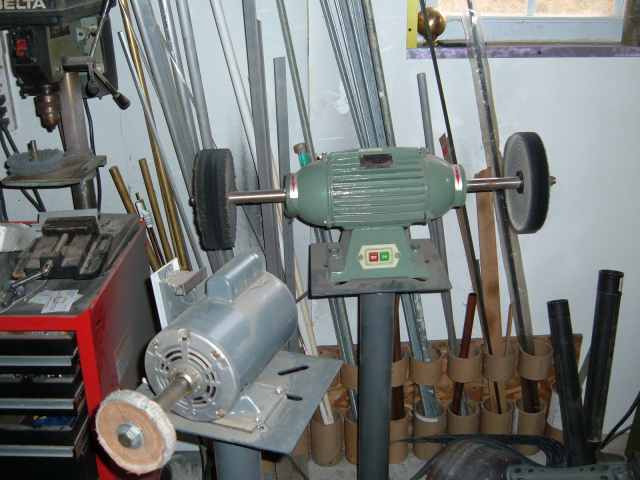
 As you can see, this is the messy end of the shop, where
grit and dust abound. This is kept away from the precision
tools and the electroplating stuff upstairs. Visible in
the lower left is a fan that is over a hole in the floor.
This is pushing warm dry air into the dirt floor crawlspace.
The belt sander is another Harbor special. This is one of
the other tools we sort of wish we'd done better on. Not that
it isn't useful, it is. But a better one would be more useful.
This one is hard to adjust the tracking on; it uses aluminum nuts
galling on steel screws (at least they don't slip). We get belts
for it at WoodWorker's Supply, which seems to have the best sandpaper
for the money. The grinder/buffer is also from Harbor, and is
very good. Nice to have a pristine wheel at both ends for that
fussy stuff. We use the orange one for the bulk of work. We
made a guide to catch the stuff into another drywall mud pan
that is usually filled with water. The age-old Delta 3 wheel saw
just keeps plugging along, with guides made by us. We change
blades so often we don't put the cover back on. Just visible
in the picture is the corner of our table saw/router. Nothing
special here. Got this cheap, used. We put a trash bag under
it, held with magnets to catch at least some of the chips, and
did some "product improvement" on the fence to make
it a good workhorse. This is actually the only tool here that
will sometimes trip a breaker. Get that blade stuck in a piece
of Cherry...
As you can see, this is the messy end of the shop, where
grit and dust abound. This is kept away from the precision
tools and the electroplating stuff upstairs. Visible in
the lower left is a fan that is over a hole in the floor.
This is pushing warm dry air into the dirt floor crawlspace.
The belt sander is another Harbor special. This is one of
the other tools we sort of wish we'd done better on. Not that
it isn't useful, it is. But a better one would be more useful.
This one is hard to adjust the tracking on; it uses aluminum nuts
galling on steel screws (at least they don't slip). We get belts
for it at WoodWorker's Supply, which seems to have the best sandpaper
for the money. The grinder/buffer is also from Harbor, and is
very good. Nice to have a pristine wheel at both ends for that
fussy stuff. We use the orange one for the bulk of work. We
made a guide to catch the stuff into another drywall mud pan
that is usually filled with water. The age-old Delta 3 wheel saw
just keeps plugging along, with guides made by us. We change
blades so often we don't put the cover back on. Just visible
in the picture is the corner of our table saw/router. Nothing
special here. Got this cheap, used. We put a trash bag under
it, held with magnets to catch at least some of the chips, and
did some "product improvement" on the fence to make
it a good workhorse. This is actually the only tool here that
will sometimes trip a breaker. Get that blade stuck in a piece
of Cherry...Following our color code, the yellow air hose is clean dry air for blowing chips and grit.
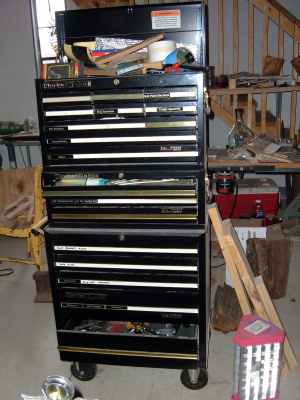 Gotta have a place for all those hand tools, duct tape and
whatnot. After some fairly serious research, we chose the
Clarke stuff. They have two quality levels, the red and
the black, the black stuff is better. This was both the
best AND the cheapest of all the offerings in the other stores
around. Comes with rubber in the drawers, ball bearing slides,
locks that work, and so on. Some boxes costing twice as much
didn't have these features, and operated in a balky fasion besides.
So, we consider this one of the real scores in our buying. Now,
a working shop has tools out on the bench all the time, and ours
sure does (see picture coming soon). What we did was get extras
for the common hand tools, so some can be out on the bench, but
if you just can't put your hand right on it, there's one in
the toolbox too (and that one you put back right away or get
a whippin').
Gotta have a place for all those hand tools, duct tape and
whatnot. After some fairly serious research, we chose the
Clarke stuff. They have two quality levels, the red and
the black, the black stuff is better. This was both the
best AND the cheapest of all the offerings in the other stores
around. Comes with rubber in the drawers, ball bearing slides,
locks that work, and so on. Some boxes costing twice as much
didn't have these features, and operated in a balky fasion besides.
So, we consider this one of the real scores in our buying. Now,
a working shop has tools out on the bench all the time, and ours
sure does (see picture coming soon). What we did was get extras
for the common hand tools, so some can be out on the bench, but
if you just can't put your hand right on it, there's one in
the toolbox too (and that one you put back right away or get
a whippin').The red thing on the floor in the back is the cooler for the employee kitchen. We've found refrigeration to be the real tough one on solar power. The thing that has worked out best is to have a freezer in an unheated building, and use that for freezing 2 liter pop bottles that then keep coolers cool around the homestead. This way the freezer doesn't run much in the winter, when it matters more. Our best power season is actually spring, when days are long but not yet hot. These tools may draw huge peak power, but they work so fast it doesn't work out to lots of kilowatt hours. Besides, they never come on in the middle of the night after a cloudy day like the freezer is wont to do.
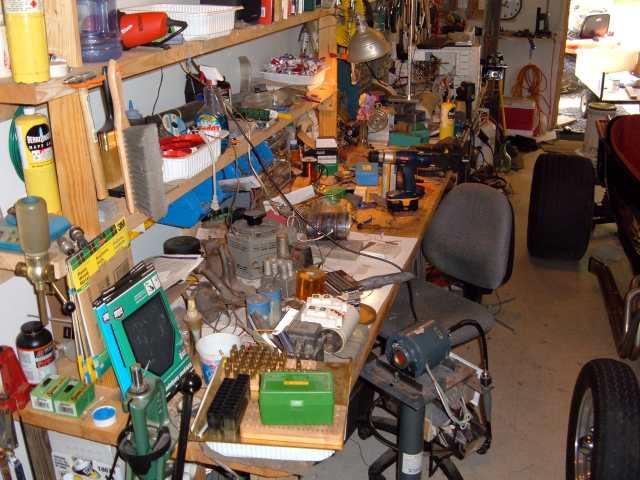 Finally, enough bench space...NOT. There is no such thing.
This bench was built in place from 16' 2x10s, and stiffens
the wall quite a bit. The shelves are also 2x material,
and provide a place to put hooks for handtools. I suppose
I am just the sort of guy who only cleans as necessary.
Finally, enough bench space...NOT. There is no such thing.
This bench was built in place from 16' 2x10s, and stiffens
the wall quite a bit. The shelves are also 2x material,
and provide a place to put hooks for handtools. I suppose
I am just the sort of guy who only cleans as necessary. In the foreground is a little super–dremel tool I built out of a 1/4 hp motor, a grinder stand, and a flex shaft. I attached a drywall mud pan to the stand to hold various bits. This thing is sweet! I've made a couple of other ones for neighbors who tried it and fell in love. It is basically plenty of torque, but silent, and reversible, and rolls on wheels to where it's needed for those little "technical adjustments".
Out the door is our Simplicity Legacy tractor and cart we use to maintain the place, pull big 4WD trucks out of ditches, plow, log, and generally apply large force to outdoor things with delicacy. The hydrostatic drive is way nice.